Growing Moringa for Personal or Commercial Use
Moringa is an ideal plant to grow indoors or in your own backyard. In fact, in the Philippines that is exactly what they do. You can pick its leaves and make it part of a delicious fresh salad, use it in one our many moringa recipes, (It goes especially well with chicken). Or you can dry the leaves to make a delicious green tea. You can also make tea with the leaf powder in a traditional coffee maker. If you have enough leaf, you can dry it and make it into moringa powder, like we do, and use it ‘s concentrated nutrition to balance your diet for increased energy and sense of well being. The possibilities are endless.
For those of you that live in the United States, particularly the southern and western states, you are in luck and can grow Moringa outside. Moringa doesn’t like the cold and loses it leaves in the winter. For those of you that have a true winter, where it freezes and snows, we recommend that you plant Moringa in pots, keeping them outside in the spring and summer and bring them inside when it gets cold. A greenhouse is ideal in most areas. The plant will die if it freezes completely but it can withstand a mild frost nonetheless. Moringa loses its leaves when the average temperature drops below 70 degrees.
The 12 Species of Moringa are among the heartiest in the Fauna kingdom. The most common species is Moringa Oleifera. Most research done in the areas of nutrition, water purification. live stock feed, vegetable dyes, herbal medicine and oil production are based on the Oleifera species. It is also the most plentiful. So, when we refer to Moringa we are referring to Moringa Oleifera.
Moringa grows in a variety of climates and substandard soils and it is as fast growing as it is hearty. Normal growth ranges from 3-5 meters per year if left uncropped. It is one of the fastest growing biomasses on the planet when properly nourished. The seed stock from Moringa Farms has varieties known to grow 7 meters in one year if left unchecked. A fully mature Moringa tree can grow to 35 feet.
Commercial Moringa plantations usually crop the trees so they don’t exceed 3-4 meters. Such a height allows the harvesters reasonable access and the cropping encourages horizontal growth enabling greater leaf production.
Germinating Seeds for Personal Use
There are several methods of germinating seeds. Some methods may work better depending on the microclimate. We are sure that there are lots of you that have your own methods of germinating seeds so we will just tell you what we have done and what has worked for us and what has worked for growers around the world.
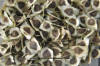
Moringa seeds have wings and are about the size of a large pea. Seeds don’t need sunlight in order to germinate. Here are some suggestions on germination.
- Soak the seeds for 24 hours; the seed will imbibe the water it needs to germinate from this procedure. Remove the seeds from the solution.
- Put the seeds in a plastic sandwich bag and store in a warm, dark place like a drawer or cabinet. Germination times range from 3-14 days. Do not add extra water to the bag.
-
Check them every two days. Once
the seeds have broken loose from the winged shell, you will notice two
shoots protruding from the seed.
- Do not let the shoots get too long and thin as they may get fragile and break when handled. One of the shoots will have some ruffled growth at the extremity; this is the shoot that contains the first leaves (cotyledons) and should be the shoot exposed to the sun. Plant the seeds about ¾ inch beneath the soil surface with the ruffled extremity to the sun. Plant the sprouted seed(s) in a commercial band or a peat pot using a high quality potting soil. Sandy loamy soils will work well also. Use a pot that is at least 18 inches deep if this is the final home for the tree. Moringa loves the sun so make sure they get plenty. Although the tree is drought tolerant, they may be watered daily, just don’t allow the roots to get soaked for extended periods of time. If you live in a particularly hot zone, don’t expose the baby plants to all day sun. Keep and eye on them, they will tell you if they are getting distressed from too much sun, water or lack of food.
- It is a good idea to use pots to get the trees started since you have more control over the care of the tree. Critters will eat the moringa babies if they can. We recommend that you let the potted plants grow at least 8 weeks or longer before transplanting to the ground. When transplanting try not to disturb the root system at all. Like many plants the roots are very vulnerable until they are established in the ground.
- If using a plastic pot, before transplanting to the ground, use a long thin blade to loosen the soil from the inside edges of the pot. Turn the band or pot upside down to allow the entire plant and soil to slide out of the container. This prevents disturbing the roots. Have a hole already dug and gently place in the hole. If you are planting more than one tree, space the plants 7-10 feet apart for optimum access to the mature tree. The tree will branch out 3-4 feet from the trunk so this spacing will allow you to walk between trees and let the sunlight to do its job. Of course if you want a wind break, just plant them all at 1 foot intervals, like they do in Africa and India. Moringa is like any plant that appreciates plant food and fertilizers and ample supply of water
7. Don’t forget, you can always just put the seeds in the ground or a large pot and water. We have found that Moringa is sensitive to the volume of soil in which it begins its life cycle.
Commercial Germination and Planting
If you plan on growing dozens or hundreds of trees then read the following article a world authority on Moringa, Lowell Fuglie. Mr. Fuglie is an expert and reliable source of information on the subject of growing Moringa commercially. Mr. Fuglie is executive director of the Church World Service hunger relief project in Senegal, Africa, and cultivates thousands of Moringa trees in that region.
CULTIVATION OF MORINGA
Lowell J. Fuglie and K. V. Sreeja
Moringa oleifera is believed to be native to sub-Himalayan tracts of northern India but is now found worldwide in the tropics and sub-tropics. It grows best in direct sunlight under 500 meters altitude. It tolerates a wide range of soil conditions, but prefers a neutral to slightly acidic (pH. 6.3-7.0), well-drained sandy or loamy soil. Minimum annual rainfall requirements are estimated at 250mm with maximum at over 3,000mm, but in waterlogged soil the roots have a tendency to rot. (In areas with heavy rainfall, trees can be planted on small hills to encourage water run-off). Presence of a long taproot makes it resistant to periods of drought. Trees can be easily grown from seed or from cuttings. Temperature ranges are 25-35 degrees Celsius (0-95 degrees Fahrenheit), but the tree will tolerate up to 48 degrees in the shade and it can survive a light frost. Moringa seeds have no dormancy period, so they can be planted as soon as they are mature and they will retain the ability to germinate for up to one year. Moringa trees will flower and fruit annually and in some regions twice annually. During its first year, a Moringa tree will grow up to five meters in height and produce flowers and fruit. Left alone, the tree can eventually reach 12 meters in height with a trunk 30cm wide; however, the tree can be annually cut back to one meter from the ground. The tree will quickly recover and produce leaves and pods within easy reach. Within three years a tree will yield 400-600 pods annually and a mature tree can produce up to 1,600 pods.
IN THE NURSERY:
Use poly bags with dimensions of about 18cm in height and 12cm in diameter. The soil mixture for the sacks should be light, i.e. 3 parts soil to 1 part sand. Plant two or three seeds in each sack, one to two centimeters deep. Keep moist but not too wet. Germination will occur within 5 to 12 days, depending on the age of the seed and pre-treatment method used. Remove extra seedlings, leaving one in each sack. Seedlings can be out-planted when they are 60-90cm high. When out-planting, cut a hole in the bottom of the sack big enough to allow the roots to emerge. Be sure to retain the soil around the roots of the seedling.
To encourage rapid germination, one of three pre-seeding treatments can be employed:
1. Soak the seeds in water overnight before planting.
2. Crack the shells before planting.
3. Remove shells and plant kernels only.
IN THE FIELD:
If planting a large plot it is recommended to first plough the land. Prior to planting a seed or seedling, dig a planting pit about 50cm in depth and the same in width. This planting hole serves to loosen the soil and helps to retain moisten in the root zone, enabling the seedlings’ roots to develop rapidly. Compost or manure at the rate of 5kg per pit can be mixed with the fresh topsoil around the pit and used to fill the pit. Avoid using the soil taken out of the pit for this purpose: fresh topsoil contains beneficial microbes that can promote more effective root growth. The day before out planting, water the filled pits or wait until a good rain before out-planting seedlings. Fill in the hole before transplanting the seedling. In areas of heavy rainfall, the soil can be shaped in the form of a mound to encourage drainage. Do not water heavily for the first few days. If the seedlings fall over, tie them to stick 40cm high for support.
DIRECT SEEDING:
If water is available for irrigation (i.e., in a backyard garden), trees can be seeded directly and grown anytime during the year. Prepare a planting pit first, water, and then fill in the pit with topsoil mixed with compost or manure before planting seeds. In a large field, trees can be seeded directly at the beginning of the wet season.
GROWING FROM CUTTINGS:
Use hard wood, not green wood, for cuttings. Cuttings should be 45cm to 1.5m long and 10cm thick. Cuttings can be planted directly or planted in sacks in the nursery. When planting directly, plant the cuttings in light, sandy soil. Plant one-third of the length in the ground (i.e., if the cutting is 1.5m long, plant it 50cm deep). Do not over water; if the soil is too heavy or wet, the roots may rot. When the cuttings are planted in the nursery, the root system is slow to develop. Add phosphorus to the soil if possible to encourage root development. Cuttings planted in a nursery can be out-planted after 2 or 3 months.
SPACING:
For intensive Moringa production, plant the tree every 3 meters in rows 3 meters apart. To ensure sufficient sunlight and airflow, it is also recommended to plant the trees in an east-west direction. When the trees are part of an alley-cropping system, there should be 10 meters between the rows. The area between trees should be kept free of weeds.
Trees are often spaced in a line one meter or less apart in order to create living fence posts. Trees are also planted to provide support for climbing crops such as pole beans, although only mature trees should be used for this purpose since the vine growth can choke off the young tree. Moringa trees can be planted in gardens; the tree’s root system does not compete with other crops for surface nutrients and the light shade provided by the tree will be beneficial to those vegetables which are less tolerant to direct sunlight. From the second year onwards, Moringa can be inter-cropped with maize, sunflower and other field crops. Sunflower is particularly recommended for helping to control weed growth.[1] However, Moringa trees are reported to be highly competitive with eggplant (Solanum melongena) and sweet corn (Zea mays) and can reduce their yields by up to 50%.
PINCHING THE TERMINAL TIPS:
When the seedlings reach a height of 60cm in the main field, pinch (trim) the terminal growing tip 10cm from the top. This can be done using fingers since the terminal growth is tender, devoid of bark fiber and brittle, and therefore easily broken. A shears or knife blade can also be used. Secondary branches will begin appearing on the main stem below the cut about a week later. When they reach a length of 20cm, cut these back to 10cm. Use a sharp blade and make a slanting cut. Tertiary branches will appear, and these are also to be pinched in the same manner. This pinching, done four times before the flowers appear (when the tree is about three months old), will encourage the tree to become bushy and produce many pods within easy reach. Pinching helps the tree develop a strong production frame for maximizing the yield. If the pinching is not done, the tree has a tendency to shoot up vertically and grow tall, like a mast, with sparse flowers and few fruits found only at the very top.
For annual Moringa types, directly following the end of the harvest, cut the tree’s main trunk to about 90cm from ground level. About two weeks later 15 to 20 sprouts will appear below the cut. Allow only 4-5 robust branches to grow and nib the remaining sprouts while they are young, before they grow long and harden. Continue the same pinching process as done with new seedlings so as to make the tree bushy. After the second crop, the trees can be removed and new seedlings planted for maximum productivity.
For perennial Moringa types, remove only the dead and worn out branches every year. Once in four or five years, cut the tree back to one meter from ground level and allow re-growth.
WATERING
Moringa trees do not need much watering. In very dry conditions, water regularly for the first two months and afterwards only when the tree is obviously suffering. Moringa trees will flower and produce pods whenever there is sufficient water available. If rainfall is continuous throughout the year, Moringa trees will have a nearly continuous yield. In arid conditions, flowering can be induced through irrigation.
FERTILIZING
Moringa trees will generally grow well without adding very much fertilizer. Manure or compost can be mixed with the soil used to fill the planting pits. Phosphorus can be added to encourage root development and nitrogen will encourage leaf canopy growth. In some parts of India, 15cm-deep ring trenches are dug about 10cm from the trees during the rainy season and filled with green leaves, manure and ash. These trenches are then covered with soil. This approach is said to promote higher pod yields. Research done in India has also showed that applications of 7.5kg farmyard manure and 0.37kg ammonium sulfate per tree can increase pod yields threefold.
PESTS AND DISEASES
Moringa is resistant to most pests. In very water-logged conditions, Diplodia root rot can occur. In very wet conditions, seedlings can be planted in mounds so that excess water is drained off. Cattle, sheep, pigs and goats will eat Moringa seedlings, pods and leaves. Protect Moringa seedlings from livestock by installing a fence or by planting a living fence around the plantation. A living fence can be grown with Jatropha curcas, whose seeds also produce an oil good for soap-making. For mature trees, the lower branches can be cut off so that goats will not be able to reach the leaves and pods. Termites can be a problem, especially when cuttings are planted.
Among approaches recommended to protect seedlings from termite attack:
· Apply mulches of castor oil plant leaves, mahogany chips, tephrosia leaves or Persian lilac leaves around the base of the plants.
· Heap ashes around the base of seedlings.
· Dry and crush stems and leaves of lion's ear or Mexican poppy and spread the dust around the base of plants.
In India, various caterpillars are reported to cause defoliation unless controlled by spraying. The budworm Noordia moringae and the scale insects Diaspidotus sp. and Ceroplastodes cajani are reportedly able to cause serious damage. Also mentioned as pests in India are Aphis craccibora, the borer Diaxenopsis apomecynoides and the fruit fly Gitonia sp.[5] Elsewhere in the world, where Moringa is an introduced tree, local pests are less numerous.
HARVESTING
When harvesting pods for human consumption, harvest when the pods are still young (about 1cm in diameter) and snap easily. Older pods develop a tough exterior, but the white seeds and flesh remain edible until the ripening process begins.
When producing seed for planting or for oil extraction, allow the pods to dry and turn brown on the tree. In some cases, it may be necessary to prop up a branch that holds many pods to prevent it breaking off. Harvest the pods before they split open and seeds fall to the ground. Seeds can be stored in well-ventilated sacks in dry, shady places.
For making leaf sauces, harvest seedlings, growing tips or young leaves. Older leaves must be stripped from the tough and wiry stems. These older leaves are more suited to making dried leaf powder since the stems are removed in the pounding and sifting process.